FlyteML的一个比较备受欢迎的特点,就是SDK的易用性,不仅可方便的集成到训练代码中,而且其丰富的插件系统可以非常方便的想数据处理、分布式计算、模型训练、部署扩展。本章主要针对flyte SDK(flytekit)进行拓展讲解,了解其中的主逻辑和原理。
1. 使用与架构
1.1 SDK使用
flytekit使用比较简单,通过task、workflow等封装器,配合其他组件类就能比较轻松的推送至远程服务器调度执行,简要代码如下
from flytekit import task, workflow
from flytekit.remote import FlyteRemote
from flytekit.configuration import Config

remote = FlyteRemote(
    Config.auto(),
    default_project="flytesnacks",
    default_domain="development",
    interactive_mode_enabled=True,
)

# Define a task that produces the string "Hello, World!"
# by using the `@task` decorator to annotate the Python function
@task
def say_hello() -> str:
    return "Hello, World!"


# Handle the output of a task like that of a regular Python function.
@workflow
def hello_world_wf() -> str:
    res = say_hello()
    return res


# Run the workflow locally by calling it like a Python function
if __name__ == "__main__":
    print(f"Running hello_world_wf() {hello_world_wf()}")

    # Execute the task
    exe = remote.execute(hello, inputs={"name": "Flyte"})

    # This will print the URL to the console
    print(exe.execution_url)

    # Wait for the task to complete
    exe = exe.wait(poll_interval=1)

    # Print the outputs
    print(exe.outputs)
通过代码可以看出首先创建一个FlyteRemote,指定project、domain等字段,其中project是指算法人员拥有访问权限工作空间,domain是指研发状态,系统默认有development、staging、production。逻辑上区分研发、预发布和产品状态,因此可以使用SDK无缝完成实验、验证、正式训练等多个环境的切换。
1.2 flytekit总体架构
我们以sdk运行workflow主流程做为切入点,梳理了其整体架构图
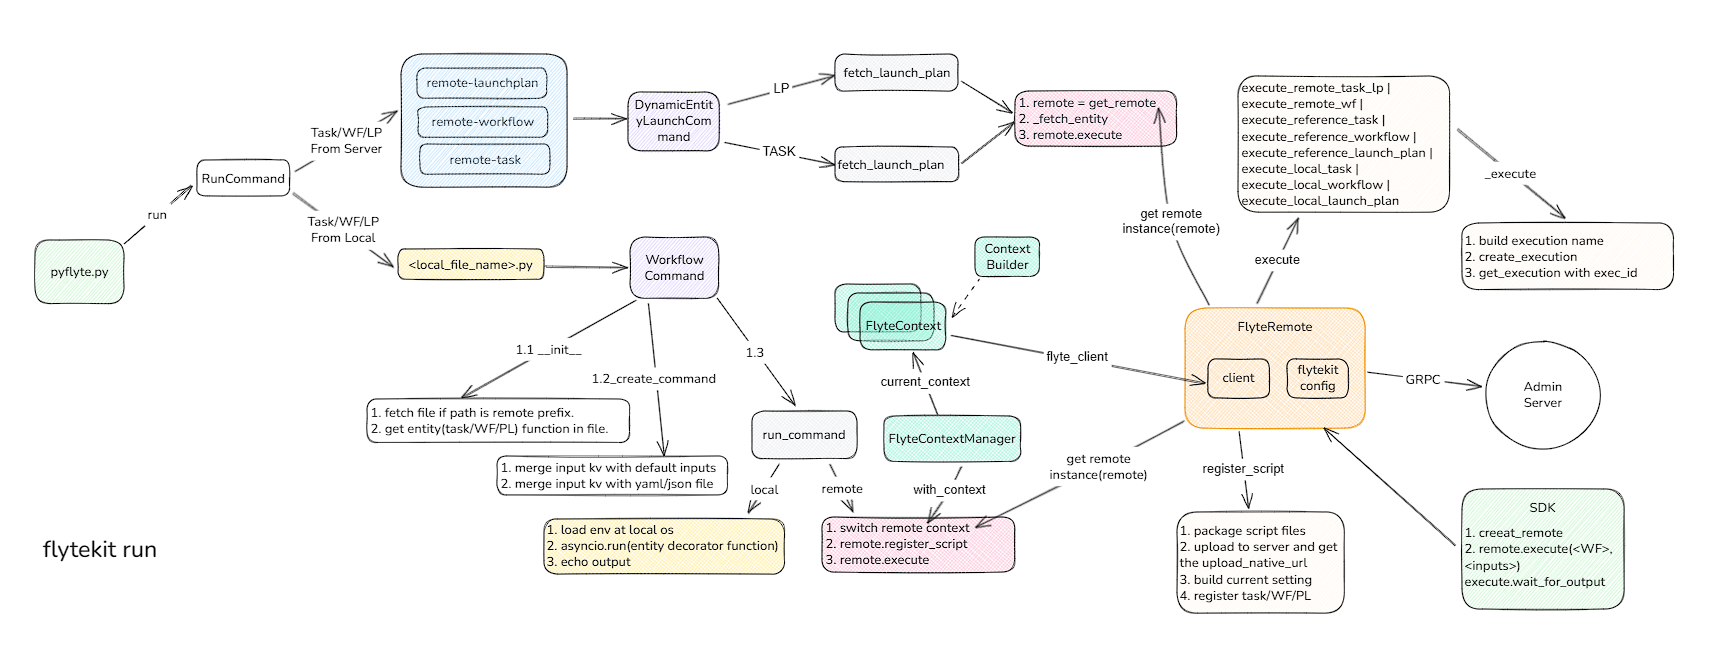
从上图可以看出,sdk的endpoint有两个: pyflyte 和 flyteRemote。
- pyflyte是用于通过命令行解析执行的py文件,发起任务。
- flyteRemote是通过代码中集成remote类,向服务器发起任务。
2. pyflyte详解
作为命令行入口,用户首先安装flytekit, 本例中使用uv虚拟环境, 并需要在$HOME/.flyte/config.yaml配置后端服务的grpc地址
uv pip install flytekit
SDK local config
admin:
  # For GRPC endpoints you might want to use dns:///flyte.myexample.com
  endpoint: dns:///172.31.11.117:8089
  insecure: true
logger:
  show-source: true
  level: 0
佳如我们上述代码为test_wf.py文件,那么只需执行命令
pyflyte run --remote ./test_wf.py hello_world_wf
此步骤会自动解析test_wf.py文件,并识别其中的entity(task、workflow、lanchplan)等,并运行,通过指定–remote参数,可以远程运行。
pyflyte代码入口位置
flytekit/clis/sdk_in_container/pyflyte.py
我们开始这部分的分析工作
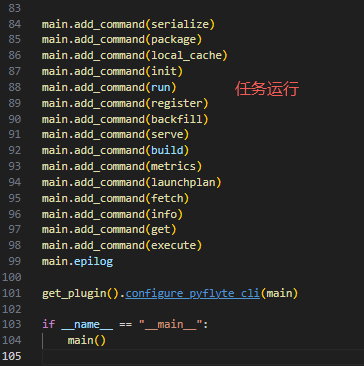
python命令行使用rich_click包作为参数解析,其中每个子命令都通过add_command来进行分块加载
对于子命令类RunCommand,是继承于click.RichGroup,其中有两个关键的回调方法list_commands->get_command,其中list_commands是tab的时候后续参数的列举,get_command是获取回车后的命令行,并执行相关命令。以WorkflowCommand举例.
2.1 workflow实体解析
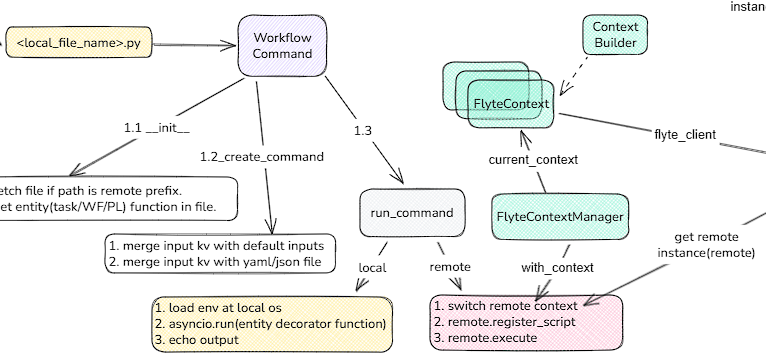
class WorkflowCommand(click.RichGroup):

    # 根据文件名从远程或本地确定指定文件,如果远程下载文件
    def __init__(self, filename: str, *args, **kwargs):
        super().__init__(*args, **kwargs)
        if ctx.file_access.is_remote(filename):
            local_path = os.path.join(os.path.curdir, filename.rsplit("/", 1)[1])
            ctx.file_access.download(filename, local_path)
            self._filename = pathlib.Path(local_path).resolve()
            self._should_delete = True
        else:
            self._filename = pathlib.Path(filename).resolve()
            self._should_delete = False

    def list_commands(self, ctx):
        # 通过文件解析task、wf、lp等装饰器实体方法
        entities = get_entities_in_file(self._filename, self._should_delete)
        self._entities = entities
        # 返回方法中的实体名称
        return entities.all()

    def get_command(self, ctx, exe_entity):
        # 先确定工作目录地址
        project_root = _find_project_root(self._filename)
        # 构造运行环境参数
        run_level_params: RunLevelParams = ctx.obj
        run_level_params.computed_params.project_root = project_root
        run_level_params.computed_params.module = module
        # 加载目标模块(exe_entity)依赖包和代码
        entity = load_naive_entity(module, exe_entity, project_root)
        return self._create_command(ctx, exe_entity, run_level_params, entity, entity_type)

     def _create_command(
        self,
        ctx: click.Context,
        entity_name: str,
        run_level_params: RunLevelParams,
        loaded_entity: [PythonTask, WorkflowBase, LaunchPlan],
        entity_type: str,
    ):
        # 获取remote实例(FlyteRemote)
        r = run_level_params.remote_instance()
        flyte_ctx = r.context

        final_inputs_with_defaults = loaded_entity.python_interface.inputs_with_defaults
        if isinstance(loaded_entity, LaunchPlan):
            # 从默认输入中提取默认值
            all_inputs = loaded_entity.python_interface.inputs_with_defaults
            default_inputs = loaded_entity.saved_inputs
            pmap = loaded_entity.parameters
            final_inputs_with_defaults = {}
            for name, _ in pmap.parameters.items():
                _type, v = all_inputs[name]
                if name in default_inputs:
                    v = default_inputs[name]
                final_inputs_with_defaults[name] = _type, v

        # Add options for each of the workflow inputs
        params = []
        for input_name, input_type_val in final_inputs_with_defaults.items():
            literal_var = loaded_entity.interface.inputs.get(input_name)
            python_type, default_val = input_type_val
            required = type(None) not in get_args(python_type) and default_val is None
            params.append(to_click_option(ctx, flyte_ctx, input_name, literal_var, python_type, default_val, required))

        h = f"{click.style(entity_type, bold=True)} ({run_level_params.computed_params.module}.{entity_name})"
        if isinstance(loaded_entity, LaunchPlan):
            h = h + click.style(f" (LP Name: {loaded_entity.name})", fg="yellow")
        else:
            if loaded_entity.__doc__:
                h = h + click.style(f" {loaded_entity.__doc__}", dim=True)
        # 同时也从yaml或json文件中读取参数
        # 最终把参数传递给run_command方法中
        cmd = YamlFileReadingCommand(
            name=entity_name,
            params=params,
            help=h,
            callback=run_command(ctx, loaded_entity),
        )
        return cmd
最终输入的命令通过对参数和运行文件的解析后,最终调用run_command命令,run_command会返回函数对象,最终被调用触发目标entity的运行。
    def _run(*args, **kwargs):
        # ...
        # 这里有个有一些关键点, 如果命令行没有--remote参数,则在本地运行,如果是feature值,再通过asyncio进行异步运行
        if not run_level_params.is_remote:
            with FlyteContextManager.with_context(_update_flyte_context(run_level_params)):
                if run_level_params.envvars:
                    for env_var, value in run_level_params.envvars.items():
                        os.environ[env_var] = value
                if run_level_params.overwrite_cache:
                    os.environ["FLYTE_LOCAL_CACHE_OVERWRITE"] = "true"
                # 本地同步
                output = entity(**inputs)
                if inspect.iscoroutine(output):
                    # 如果是协程函数,异步执行
                    # TODO: make eager mode workflows run with local-mode
                    output = asyncio.run(output)
                click.echo(output)
                return

        # 以下是进行远程执行
        # 创建运行上下文,对这次运行所维护的状态信息进行入栈,FlyteContextManager稍后进行解析
        with context_manager.FlyteContextManager.with_context(remote.context.new_builder()):
            # 向后端服务器发送请求,创建相关entity数据库记录,并会将输入和输出存储远程对象存储,将相关的ref信息返回
            # 这其中包括:1.打包代码文件;2.上传至对象存储,并获得引用; 3.生成执行setting,序列号选项等
            remote_entity = remote.register_script(...)
            # 远程执行remote_entity,最终会执行remote.execute
             execution = remote.execute(
                entity,
                inputs=inputs,
                project=project,
                domain=domain,
                execution_name=run_level_params.name,
                options=options_from_run_params(run_level_params),
                type_hints=type_hints,
                overwrite_cache=run_level_params.overwrite_cache,
                interruptible=run_level_params.interruptible,
                envs=run_level_params.envvars,
                tags=run_level_params.tags,
                cluster_pool=run_level_params.cluster_pool,
                execution_cluster_label=run_level_params.execution_cluster_label,
            )
所有的远程运行都是在FlyteContextManager中进行的,可通过切换context来维护线程中的独立的状态和代码执行位置,保证任务可以互不影响的并行运行,下载来详细介绍一下FlyteContextManager
# 列举几个关键方法
class FlyteContextManager(object):

     @staticmethod
    def initialize():
        """
        Re-initializes the context and erases the entire context
        """
        # 设置默认id
        default_execution_id = _identifier.WorkflowExecutionIdentifier(project="local", domain="local", name="local")

        cfg = Config.auto()
        # 默认context工作目录.
        user_space_path = os.path.join(cfg.local_sandbox_path, "user_space")
        pathlib.Path(user_space_path).mkdir(parents=True, exist_ok=True)

        # 处理退出信号
        if threading.current_thread().name == threading.main_thread().name:
            signal.signal(signal.SIGINT, main_signal_handler)

        # 创建临时目录,并关联其provider,构建此栈帧的FlyteContext
        default_context = FlyteContext(file_access=default_local_file_access_provider)
        # 设置栈帧维护的参数
        default_user_space_params = ExecutionParameters(
            execution_id=WorkflowExecutionIdentifier.promote_from_model(default_execution_id),
            task_id=_identifier.Identifier(_identifier.ResourceType.TASK, "local", "local", "local", "local"),
            execution_date=datetime.now(timezone.utc),
            stats=mock_stats.MockStats(),
            logging=user_space_logger,
            tmp_dir=user_space_path,
            raw_output_prefix=default_context.file_access._raw_output_prefix,
            decks=[],
        )

        default_context = default_context.with_execution_state(
            default_context.new_execution_state().with_params(user_space_params=default_user_space_params)
        ).build()
        default_context.set_stackframe(s=FlyteContextManager.get_origin_stackframe())
        # 入栈
        flyte_context_Var.set([default_context])

    @staticmethod
    def current_context() -> FlyteContext:
        if not flyte_context_Var.get():
            # 默认创建一个default stack
            FlyteContextManager.initialize()
        # 返回栈顶context
        return flyte_context_Var.get()[-1]

    @staticmethod
    def get_origin_stackframe(limit=2) -> traceback.FrameSummary:
        ss = traceback.extract_stack(limit=limit + 1)
        if len(ss) > limit + 1:
            # 选择跳过的最后一个栈帧
            return ss[limit]
        return ss[0]

    @staticmethod
    @contextmanager
    def with_context(b: FlyteContext.Builder) -> Generator[FlyteContext, None, None]:
        # b.build() 会创建一个当前的FlyteContext,并入栈,同时关联当前代码的stackframe(返回最近的3个调用栈frame),跳过get_origin_stackframe调用函数
        ctx = FlyteContextManager.push_context(b.build(), FlyteContextManager.get_origin_stackframe(limit=3))
        l = FlyteContextManager.size()
        try:
            # 所有栈执行完后,退出上下文
            yield ctx
        finally:
            while FlyteContextManager.size() >= l:
                FlyteContextManager.pop_context()
最后remote模块重中的execute方法,此步会根据不同的entity类型做实体数据的关联,比如task实例会做lp和wf的关联,然后将相关的信息发送至admin后端进行编译。以Worflow为例
if isinstance(entity, WorkflowBase):
    return self.execute_local_workflow(
        entity=entity,
        inputs=inputs,
        project=project,
        domain=domain,
        name=name,
        version=version,
        execution_name=execution_name,
        execution_name_prefix=execution_name_prefix,
        image_config=image_config,
        options=options,
        wait=wait,
        overwrite_cache=overwrite_cache,
        interruptible=interruptible,
        envs=envs,
        tags=tags,
        cluster_pool=cluster_pool,
        execution_cluster_label=execution_cluster_label,
        serialization_settings=serialization_settings,
    )

 def execute_local_workflow(
        self,
        entity: WorkflowBase,
        inputs: typing.Optional[typing.Dict[str, typing.Any]] = None,
        project: str = None,
        domain: str = None,
        name: str = None,
        version: str = None,
        execution_name: typing.Optional[str] = None,
        execution_name_prefix: typing.Optional[str] = None,
        image_config: typing.Optional[ImageConfig] = None,
        options: typing.Optional[Options] = None,
        wait: bool = False,
        overwrite_cache: typing.Optional[bool] = None,
        interruptible: typing.Optional[bool] = None,
        envs: typing.Optional[typing.Dict[str, str]] = None,
        tags: typing.Optional[typing.List[str]] = None,
        cluster_pool: typing.Optional[str] = None,
        execution_cluster_label: typing.Optional[str] = None,
        serialization_settings: typing.Optional[SerializationSettings] = None,
    ) -> FlyteWorkflowExecution:
        # 补全默认镜像
        if not image_config:
            image_config = ImageConfig.auto_default_image()
        # 如果没有序列号设置,补全
        ss = serialization_settings or SerializationSettings(
            image_config=image_config,
            project=project or self.default_project,
            domain=domain or self._default_domain,
            version=version,
        )
        if version is None and self.interactive_mode_enabled:
            version, _ = self._resolve_version(version, entity, ss)

        # input转换成字典
        resolved_identifiers = self._resolve_identifier_kwargs(entity, project, domain, name, version)
        resolved_identifiers_dict = asdict(resolved_identifiers)

        try:
            # Just fetch to see if it already exists
            # todo: Add logic to check that the fetched workflow is functionally equivalent.
            self.fetch_workflow(**resolved_identifiers_dict)
        except FlyteEntityNotExistException:
            logger.info("Registering workflow because it wasn't found in Flyte Admin.")
            # 如没有发现相关wf,重新注册
            self.register_workflow(
                entity,
                ss,
                version=version,
                options=options,
            )

        try:
            # 关联LP
            flyte_lp = self.fetch_launch_plan(**resolved_identifiers_dict)
            flyte_lp.python_interface = entity.python_interface
        except FlyteEntityNotExistException:
            logger.info("Try to register default launch plan because it wasn't found in Flyte Admin!")
            default_lp = LaunchPlan.get_default_launch_plan(self.context, entity)
            self.register_launch_plan(
                default_lp,
                project=resolved_identifiers.project,
                domain=resolved_identifiers.domain,
                version=version,
                options=options,
            )
            flyte_lp = self.fetch_launch_plan(**resolved_identifiers_dict)
        # 执行
        return self.execute(
            flyte_lp,
            inputs,
            project=project,
            domain=domain,
            execution_name=execution_name,
            execution_name_prefix=execution_name_prefix,
            wait=wait,
            options=options,
            type_hints=entity.python_interface.inputs,
            overwrite_cache=overwrite_cache,
            interruptible=interruptible,
            envs=envs,
            tags=tags,
            cluster_pool=cluster_pool,
            execution_cluster_label=execution_cluster_label,
        )
最终调用admin的client,发送proto grpc请求到admin server
def _execute(self, ...) -> FlyteWorkflowExecution:
    # 根据当前文件切换上下文,获取文件上传地址
    self.file_access._get_upload_signed_url_fn = functools.partial(
        self.client.get_upload_signed_url,
        project=project or self.default_project,
        domain=domain or self.default_domain,
    )
    # 转换python input map 到 定义的 literal_inputs pb
    literal_inputs = literal_models.LiteralMap(literals=literal_map)

    # 发送执行请求
    exec_id = self.client.create_execution(
        project or self.default_project,
        domain or self.default_domain,
        execution_name,
        # 构建Spec和metadata
        ExecutionSpec(
            entity.id,
            ExecutionMetadata(
                ExecutionMetadata.ExecutionMode.MANUAL,
                "placeholder",  # Admin replaces this from oidc token if auth is enabled.
                0,
            ),
            overwrite_cache=overwrite_cache,
            interruptible=interruptible,
            notifications=notifications,
            disable_all=options.disable_notifications,
            labels=options.labels,
            annotations=options.annotations,
            raw_output_data_config=options.raw_output_data_config,
            auth_role=None,
            max_parallelism=options.max_parallelism,
            security_context=options.security_context,
            envs=common_models.Envs(envs) if envs else None,
            tags=tags,
            cluster_assignment=ClusterAssignment(cluster_pool=cluster_pool) if cluster_pool else None,
            execution_cluster_label=ExecutionClusterLabel(execution_cluster_label)
            if execution_cluster_label
            else None,
        ),
        literal_inputs,
    )
2.2 命令行指定实体运行解析
pyflyte也可以指定远程实体执行,有remote-launchplan、remote-workflow、remote-task三个命令。和wf类似,最终也是和lp做关联,然后获取remote实体,发送至admin服务器

2.3 代码中直接引用FlyteRemote
我们从上面的举例代码中可以看到远程实例就是FlyteRemote,因此自然的,在代码中我们可以直接创建remote,并调用execute方法运行。
 exe = remote.execute(hello, inputs={"name": "Flyte"})
 # 并可以同步等待wf执行结果(1s检查一次)
 exe = exe.wait(poll_interval=1)
3. 总结
本节重点总结flyte SDK的运行主流程,这其中还有诸如plugin、执行node model构建等分支模块,会根据后端服务的展开逐步展开解析。